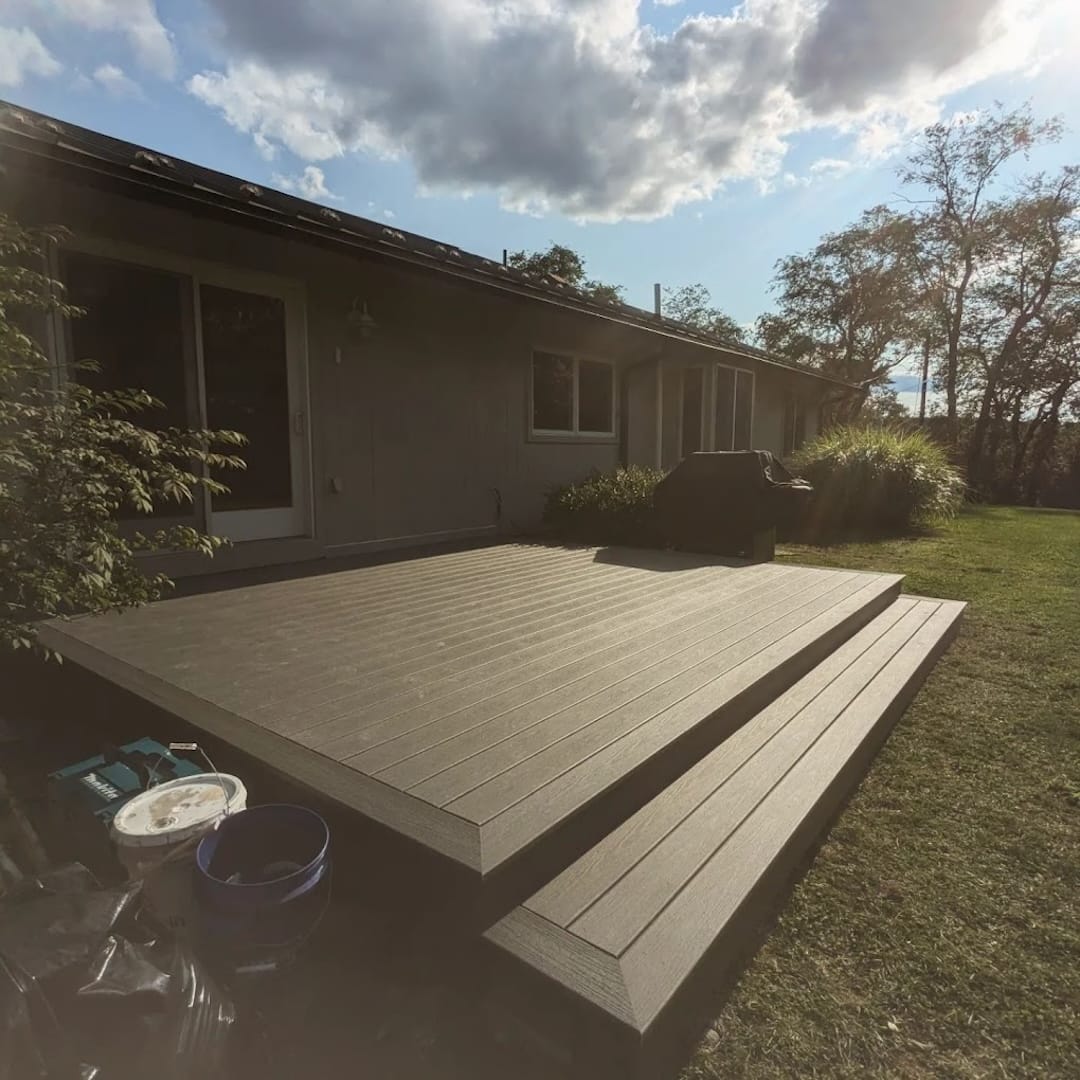
Rear Entry Deck Replacement for Home Sale in Warwick, NY
Odd Job Adam rebuilt a rear entry deck in Warwick, NY so the home could meet building code requirements before being sold. The project included obtaining a permit from the Town of Warwick, installing frost-depth footings with 6x6 structural posts, repairing rot in the home's rim joist, and installing a properly flashed ledger board. The deck was framed with a drop beam and cantilevered joists, then finished with premium pressure treated decking, custom wood railings with cedar cap rails, and a reinforced stair system using five stringers. The completed deck is structurally sound, code-compliant, and ready for inspection.
Rear Entry Deck Replacement for Home Sale
Warwick, NY Deck Project – Built to Code
When a homeowner in Warwick, NY prepared their home for sale, one of the final obstacles was an aging rear entry deck that did not meet current building codes. In order for the home sale to move forward smoothly, the deck needed to be rebuilt and permitted through the Town of Warwick Building Department. Odd Job Adam was brought in to design and rebuild the deck so it would pass inspection while remaining cost-effective for the seller.
Obtaining a Deck Permit in Warwick, NY
Before any demolition began, we prepared the necessary drawings and submitted a permit application to the Town of Warwick Building Department. This ensures that the deck construction follows current structural and safety standards and allows the project to be inspected during construction. Permits protect both the homeowner and the future buyer by ensuring the deck meets the International Residential Code (IRC) requirements for structural support, railings, and stair construction.
For reference, the deck was designed to comply with guidelines found in the International Residential Code (IRC) and Local Warwick, NY Building Codes: https://codes.iccsafe.org/content/IRC
Deck Demolition & Repairing Rot in the Rim Joist
The existing deck was small, measuring 16 square ft with a staircase. We removed the existing framing and handled the disposal of the old deck materials.
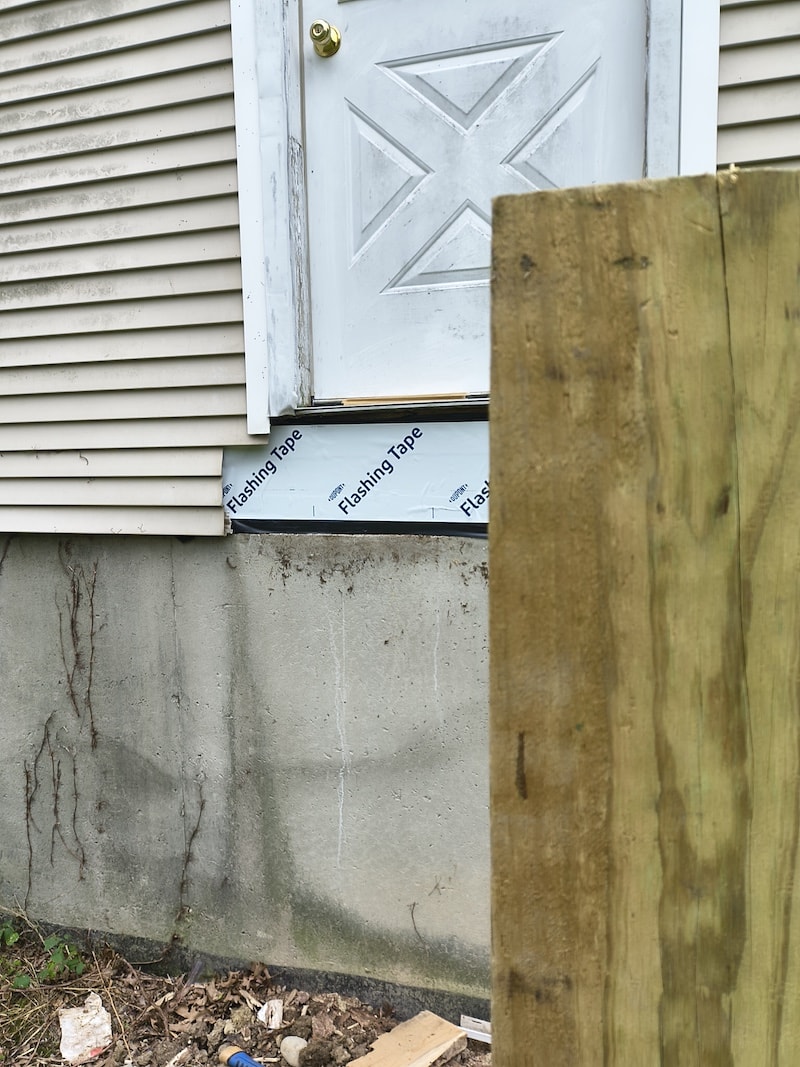
Once the existing deck was removed, we discovered rot in the home's rim joist where the old ledger board had been installed. This is a common issue with older decks where flashing was either missing or improperly installed.
To ensure the deck connection was safe and long-lasting we:
Removed the damaged section of rim joist
Installed new structural framing
Properly Flashed the new framing
Installed a new ledger board
To protect the structure from moisture we installed:
Aluminum ledger flashing similar to this Amerimax product from Lowe’s
Proper flashing ensures water cannot get behind the ledger board and cause future rot.
Rotten Rim Joist of house, in some areas, there was less than 1/8" of material left.
No Flashing was installed behind this ledger board. This is especially a problem when under doors or windows where siding gaps and trim could increase water penetration possibilities.
Profile image of Rotted Rim Joist wood that was removed. This was the thickest remaining section.
After new rim joist was added with plywood, we flashed with Tyvek flashing tape, and metal z flashing on theledger.
Proper Footings Below Frost Depth
One of the most important structural elements of any deck in the Hudson Valley is the footing system. Because our region experiences freeze-thaw cycles, footings must extend below the frost depth (typically around 42–48 inches in Warwick, NY) to prevent heaving.
For this project we installed:
Concrete footings below frost depth. This includes digging 48" deep, and for this deck, the concrete footings had to be 14" in diameter and a minimum of 6" thick at that depth. For larger decks, these footings are often much larger to handle higher loads.
We then installed 6x6 pressure treated posts anchored to the footings below grade.
This method is a budget-friendly but structurally sound approach commonly used in residential deck construction. While there are some concerns about burying deck posts, this method is still an approved method of construction in the IRC (International Residential Code). This construction method is also more affordable and a good option for customers looking to get the most out of their budget.
There are also structural benefits to this technique. When deck posts are buried into the ground, they can provide significant lateral stability to the deck structure. While modern building practices often use post bases on top of footings, embedded posts are still recognized in many construction scenarios for their ability to resist horizontal movement.
At Odd Job Adam, we offer both options of footings below grade with buried posts and footings with concrete piers brought above grade. Piers cost an extra $4 per square foot compared to buried posts, and do require additional bracing and hardware to ensure the deck has enough lateral stability.
After working with several engineers, they typically recommend buried deck posts for standard residential applications. This is because piers can be overkill for most standard deck installations. One reason they recommend this is because in the Northeast, the pier ends up being 12"-16" in diameter and is usually a minimum of 54" tall (48" to grade and 6" above grade). That adds about 400-450 pounds of additional weight on each deck footing.
Keeping deck posts above grade and dry is ideal, and best practice, especially in areas that can collect water, but it is important to know that it is not the only option out there for residential construction.
Deck Framing: Landing with Drop Beam and Cantilever
The deck was designed as a small landing platform for the rear entry door.
The framing system included:
A structural ledger board attached to the house
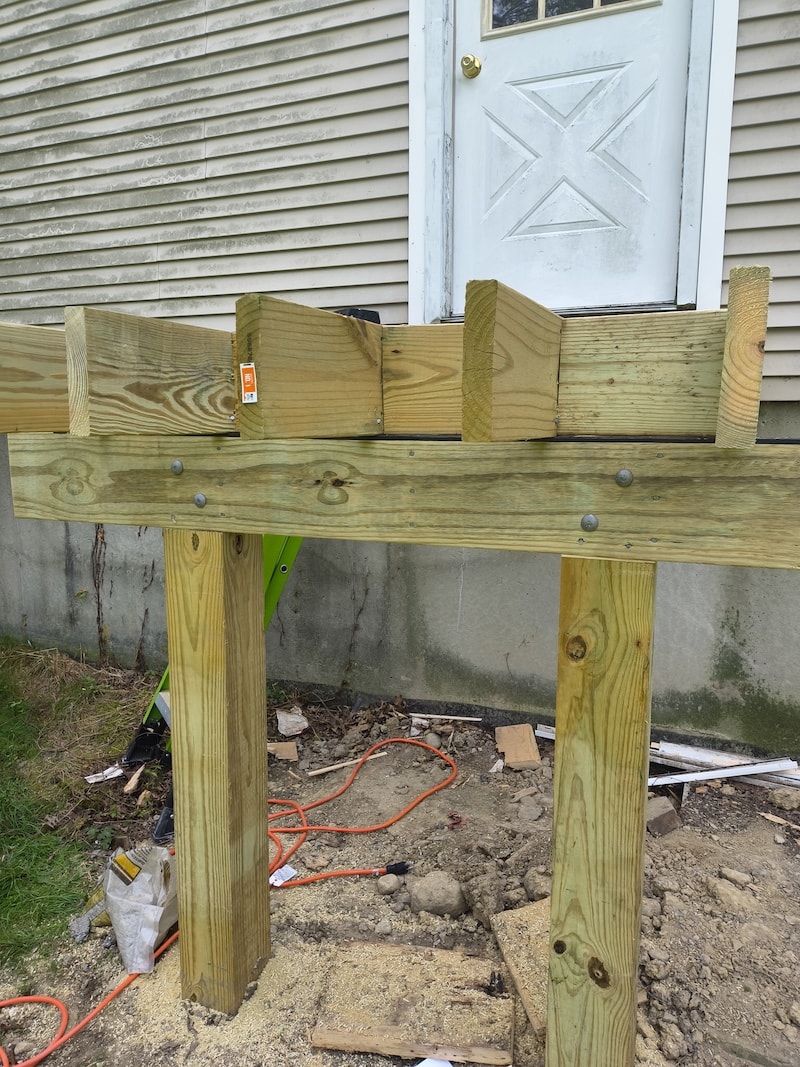
A laminated 2x8 drop beam supported by the 6x6 posts
Cantilevered joists extending beyond the beam
This framing approach creates a strong and efficient structure while minimizing the number of posts required.
This image shows how the 6x6 posts are buried and the dropbeam install where the joists run over the beam. This is before blocking above the beam, and the rim joist is added.
Installing Strong Railing Posts
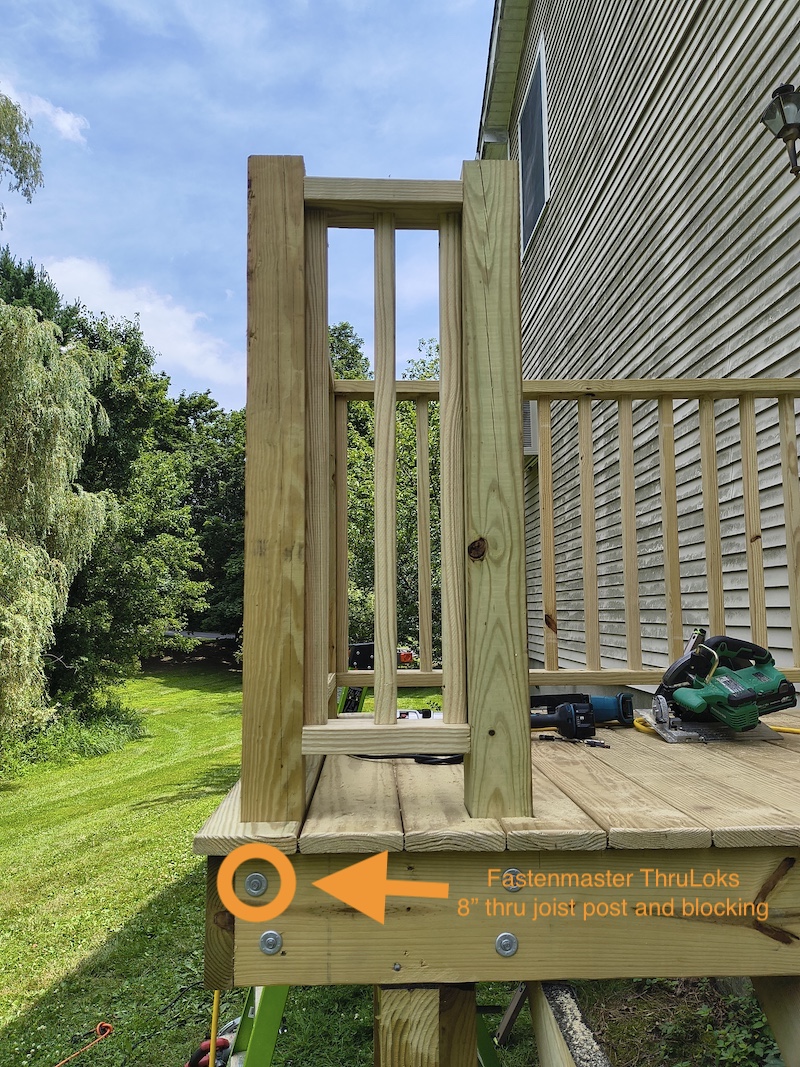
Before installing the decking boards, we installed the railing posts.
This is an important step because it allows the posts to be fully integrated into the framing rather than simply bolted through the finished decking.
This creates an extremely rigid railing system that meets modern deck safety standards. Gone are the days of notched 4x4s attached to the outside of a rim joist.
Posts get Fastenmaster Thruloks installed through Rim, Post, and Blocking. These replace 1/2" carriage Bolts. I'm mixed on their final aesthetic, but they do offer a faster install and fairly low profile. They are required to be offset as you see here, so they aren't in the same plane. This again, is less aesthetic, so consider adding fascia, or upgrading to a finished hardware option.
Premium Pressure Treated Decking Installation
Once framing was complete, we installed premium pressure treated decking boards. The premium decking is worth the slightly extra cost. Pressure treated is already affordable, and premium has less knots and imperfections.
These fasteners are designed specifically for decking applications and provide:
Excellent corrosion resistance
Strong holding power
A clean finished appearance
We screw all our decking down. Nails just do not provide enough longevity and are likely to pop as the wood begins to dry out and goes through a few winters. That's a good thing to ask your contractor before construction, since nails are way cheaper and faster to install, but don't benefit the homeowner in any way.
Custom Built Wood Railings
For the railing system, we built custom railings onsite using pressure-treated lumber.
The railing design included:
Pressure treated 2x4 rails
Pre-assembled 2x2 balusters
A cedar cap rail
The cedar cap rail was fastened from underneath, which means:
No exposed fasteners
Reduced water penetration
A cleaner finished look
This style of railing is durable, attractive, and easy to maintain.
We construct our railings to fit the opening and measure for equal spacing between balusters with one baluster on each end connecting to the posts. This allows us to fasten the railing at multiple locations along that edge baluster instead of just at the top and bottom. Wethen added a cedar caprail to this build that is fastened from below to the 2x4 so that there are no exposed fasteners in the railing assembly.
Strong Stair Construction
The rear entry deck required a staircase to grade.
For extra durability we constructed the stairs using four stair stringers, which provides a much more rigid stair system compared to the typical three-stringer design.
Instead of hanging the stairs off a header board, we:
Cut the stringers to the exact height of the deck
Framed them directly back into the deck framing
This method creates a stronger and more integrated stair structure.
The stair railings were built using the same custom railing system as the deck, installed to match the pitch of the staircase.
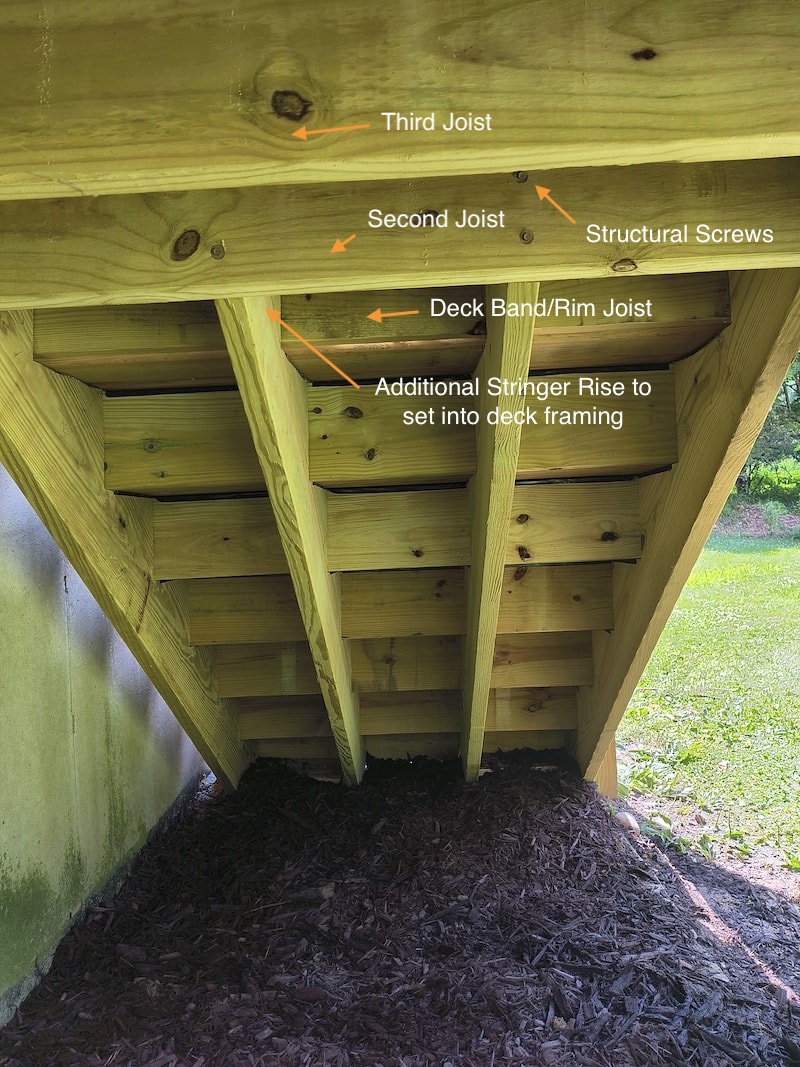
Here is a look at the stair layout. We install 2x8 risers for rigidity, then 5/4" decking for the treads. Our stringer runs to thetop of the deck frame and gets built into the framing tied between the rim joist and the second joist with 6" structural screws and angle hardware on the rim side. This avoids having to install a drop header, and results in a stronger stair to deck connection.
A Safe, Code-Compliant Deck Ready for Sale
The finished deck now meets modern building standards and provides the home with a safe, durable rear entry landing that will pass inspection during the home sale process.
By addressing structural issues, installing proper flashing, and building the deck according to current code standards, the homeowner was able to move forward with confidence as they prepared their property for the market.


.jpg)
